Super Easy Beautiful Bow With Thick Ribbon
Learn how to tie a perfect bow with this easy step-by-step tutorial!
These simple bows can be made using thin or thick ribbon, and they're the perfect finishing touch for any present!

This post contains affiliate links. As an Amazon Associate I earn from qualifying purchases.
I love, love, love receiving a beautiful package. And a pretty bow is like the cherry on a sundae ... a must!
A basic bow can be deceivingly difficult to tie, but it doesn't have to be. I've perfected a simple bow that looks beautiful on any package (and with any ribbon).
And you can, too ... today, I'm going to show you how to tie a perfect bow! This step by step tutorial will walk you through the whole process... it's so easy.
These simple bows are the ideal way to top your perfectly wrapped gifts, and the technique can be used in home decor projects, like wreaths, too!
Reading to get started? You'll find all the tips, plus a video, below.
How to Tie a Perfect Bow with Ribbon
Want to learn how to tie a simple ribbon bow? Tying the perfect bow is easier than you think!
Here's what you'll need:
- Ribbon (any size, wired or non-wired)
- Scissors
- Gift
Start by cutting a long piece of ribbon. Give yourself a little wiggle room, you'll need more than you think.
And make sure to use sharp scissors! Dull scissors will butcher your ribbon and give you bad results. These Scotch scissors are my fave, and they're super affordable. Get a pair or two and hide them from your kids!
Wrap the ribbon around your package and knot it once on top. Then, form a loop with one of the loose ribbon ends.

Keep holding that loop, while wrapping the other piece of ribbon around and under it. Don't pull anything too tight for right now.

Pull that same ribbon through the center, creating a second loop.

Play with your bow—adjusting the size of the loops, pulling on the loose ends, and gradually tightening it up—until it looks good.
Once it looks how you want, pull the loops tight to secure the ribbon.
Trim the ends of the ribbon on an angle. Or for a double point, fold the ribbon in half and cut it on a 45 degree angle (from the ribbon edge up toward the folded edge).

And that's it ... you just learned how to tie a perfect bow. Wasn't that easy?
Once you play around with this technique a bit, you'll never have another wonky bow. It really is simple.
Tip: If you'd like a quick overview of the steps, this tutorial is also available as a web story!

How to Wrap Ribbon Around a Box ... Without a Bump
Want to learn one more easy bow tying technique? This is one of my faves!
You know how when you double wrap ribbon around a box, you usually get a bump on the bottom where the ribbon twists together? This easy ribbon tying technique will help you avoid that ... it's kind of ingenious.
You will need a long piece of ribbon for this ... be generous!
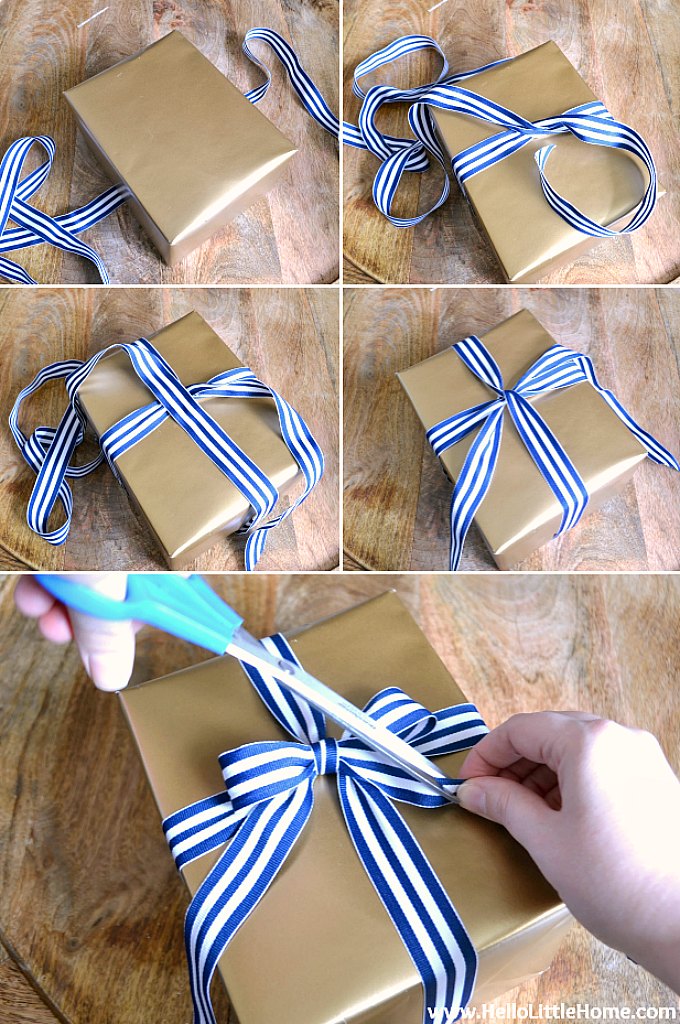
- Start with your present facing up. Place the ribbon underneath the box. (top left below)
- Draw both ends of the ribbon up to the top of the box. Adjust the ribbon so you have one long end (long enough to wrap around the box) and one shorter end (enough to tie a bow later). (top right below)
- Twist the ribbon on the top of the box, and then wrap only the long end all the way around the box. The short end stays on top of the box. (second row, left)
- Tuck the long end under the ribbon on top of the box (just to the left of the twist), then knot it with the other loose ribbon end.
- Follow my steps above for how to tie a gift bow.
The other nice thing about this technique is that the bow is moveable even after it's tied. So if your bow is not perfectly centered you can move it into place.
More Bow Tying Tips
I hope you enjoyed these tips and tricks for tying a perfect bow. Keep practicing and you will get it!
Here are few things to keep in mind when creating your bows:
- This tutorial works with thick and thin ribbon, and you can do it with ribbon that's wired or not, too.
- As a general rule of thumb, pair thinner ribbon with smaller packages, and thicker ribbon with larger packages. A tiny bow usually doesn't look great on a big box, although a huge, lush bow can look very elegant on a small package (rules are meant for breaking sometimes).
- It can be fun to combine two or three layers of the same ribbon (or even different colors of ribbon) in one bow. Just hold the ribbon together as you create the bow, then pull apart the different loops when the bow is tied. This works better with thinner ribbon.
- The same ribbon will look completely different on different size packages. Take satin ribbon, for example. If you're making a small bow with a wide satin ribbon, the finished bow will usually have lots of volume. A large satin bow will probably be a little floppy though. Keep this in mind when choosing ribbon.
- I recommend using wired ribbon for larger bows. The wire gives the bow shape and volume. Plus, you can always reshape the bow if it gets flattened (helpful if you're traveling with presents).
- The bigger the bow, the better, in my opinion! Make your bows as big as possible, and let the ends go off the box a bit.
More Gift Wrapping Tips
Okay, now you know how to tie a perfect bow, but does your gift wrapping technique still need a little help? I've got you covered there, too! Just check out my easy tutorial to learn how to wrap a present professionally!
If you're looking for gift tags, make sure to grab these Chalkboard Gift Tags, Candy Cane Gift Tags, and Seasons Greetings Gift Tags. And don't miss my roundup of 20 Printable Christmas Gift Tags ... there are so many fun and festive options!

Do you enjoy wrapping gifts, too? What is your favorite part?
Save
Source: https://hellolittlehome.com/how-to-tie-a-perfect-bow/
0 Response to "Super Easy Beautiful Bow With Thick Ribbon"
Post a Comment